Count configurator quote requests as Google Ads conversions
Last updated
For the person who looks after the maker’s website and Google Ads. About 20 minutes, with Google Tag Manager already on the site. Last checked against Google’s help pages: October 2026 (Google renames menus now and then; the sources below have the current wording).
What you get: each quote request sent from the configurator on your site is counted as a conversion in Google Ads, with the build’s price as its value and the quote request’s id as the transaction id, so it is never counted twice. Later, the deals you actually win can be uploaded too. How many conversions you see depends on your traffic, your visitors’ consent choices and their browsers; nothing here changes how your ads perform.
Before you start
- Google Tag Manager is on the website (a container id like
GTM-ABC1234), and you can edit and publish it. - Google Ads: you can create conversion actions in the account.
- The maker has turned on Count ad conversions for their configurator (ask us if it is not shown in their admin).
- The configurator is embedded in a page (iframe). A configurator opened full page by a link or button sends no events, as there is no page of yours around it; its click ids still reach the quote request, for the won-deal upload.
1. Use the embed code that passes the ad click id
In the maker’s admin, Install → Count ad conversions → Inside your page: copy that code and use it on the page, instead of the plain embed code. Its few inline lines copy gclid, gbraid, wbraid and the utm_ values from your page’s address onto the configurator, so the quote request remembers which ad click it came from. Nothing is loaded from us.
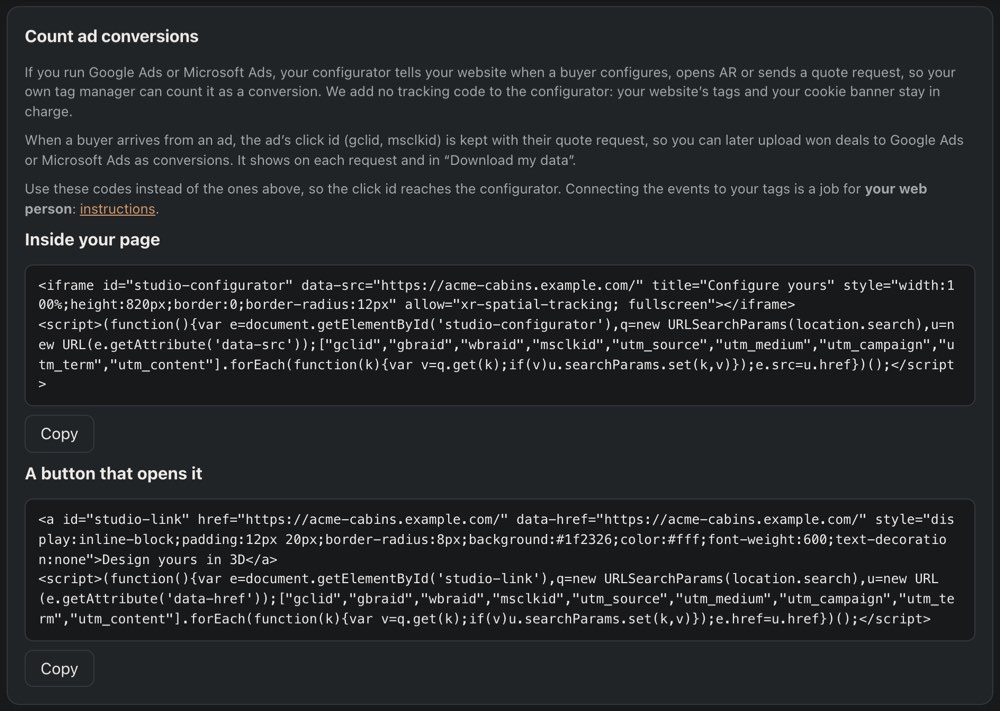
Note the configurator’s address in that code (the data-src, here https://acme-cabins.example.com/): you need it in step 4, without the slash at the end.
2. Create the conversion action in Google Ads
- In Google Ads: Goals → Conversions → Summary → + Create conversion action (or New conversion action).
- Choose Website (conversions on a website) and enter the website’s address.
- Choose to add the conversion action manually (not the automatic “from page loads or clicks” option).
- Goal and action: Submit lead form. Name: Configurator quote request.
- Value: Use different values for each conversion, with a default value of your choice (used when a build is priced only in the maker’s quote and has no online price).
- Count: One (one conversion per click, as for leads). Keep the other settings or adjust them to how you work.
- Save, then on the tag set-up screen choose Use Google Tag Manager. Copy the Conversion ID (digits) and the Conversion label.
Whether this action counts towards bidding (primary or secondary) is your choice in the action’s settings; start it as secondary if you want to watch the numbers before bidding on them.
3. Import the ready-made container into Tag Manager
Download studio-gtm-container.json
- In Tag Manager: Admin → Import Container.
- Choose container file: the file you downloaded.
- Workspace: Existing (your default workspace) or a new one if you prefer to review it apart.
- Import option: Merge → Rename conflicting tags, triggers and variables. Never choose Overwrite: it would replace your container.
- Confirm (Add to workspace). Tag Manager shows what it adds: 7 tags, 5 triggers and 9 variables, all named
Studio - …orDLV - studio_…. Nothing goes live until you submit and publish.
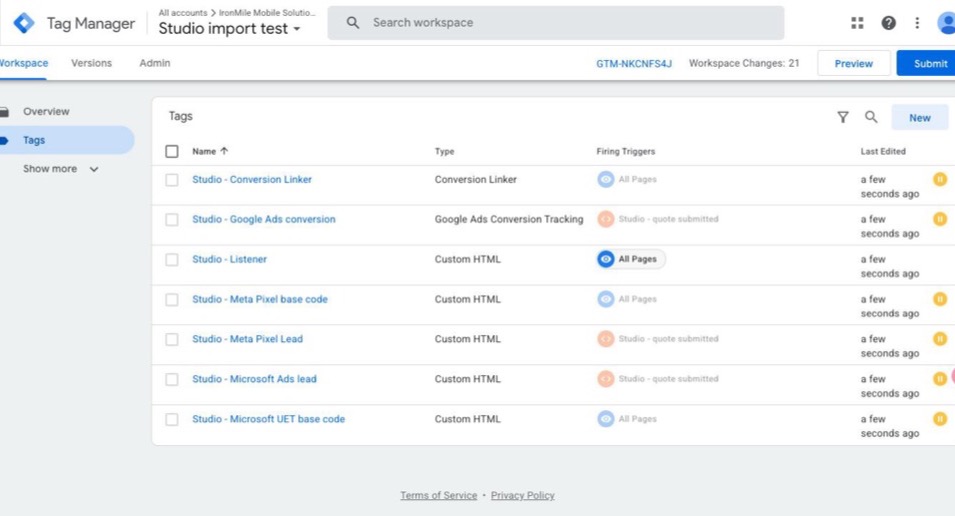
Studio - Listener is active; the ad tags show the paused sign.| Imported | What it does | State |
|---|---|---|
Studio - Listener | Listens for the configurator’s events, only from its own address, and puts them in the data layer (studio:view, studio:configure, studio:ar_open, studio:quote_open, studio:quote_submitted). Sends nothing anywhere. | On |
Studio - Google Ads conversion | The conversion, on studio:quote_submitted: value, currency, transaction id. | Paused |
Studio - Conversion Linker | Google’s Conversion Linker on all pages (keeps the ad click for the conversion). | Paused |
Studio - Meta Pixel …, Studio - Microsoft … | For Meta and Microsoft Ads (their own guides). Leave them paused if you don’t use them. | Paused |
4. Fill in three variables
In Variables → User-Defined Variables, open each and replace the value:
| Variable | Value |
|---|---|
Studio - Configurator address | The configurator’s address from step 1, e.g. https://acme-cabins.example.com (https, no path, no slash at the end). If the configurator has two addresses, put both, separated by a comma. |
Studio - Google Ads conversion ID | The Conversion ID from step 2 (digits only, without AW-). |
Studio - Google Ads conversion label | The Conversion label from step 2. |
5. Turn the two Google tags on
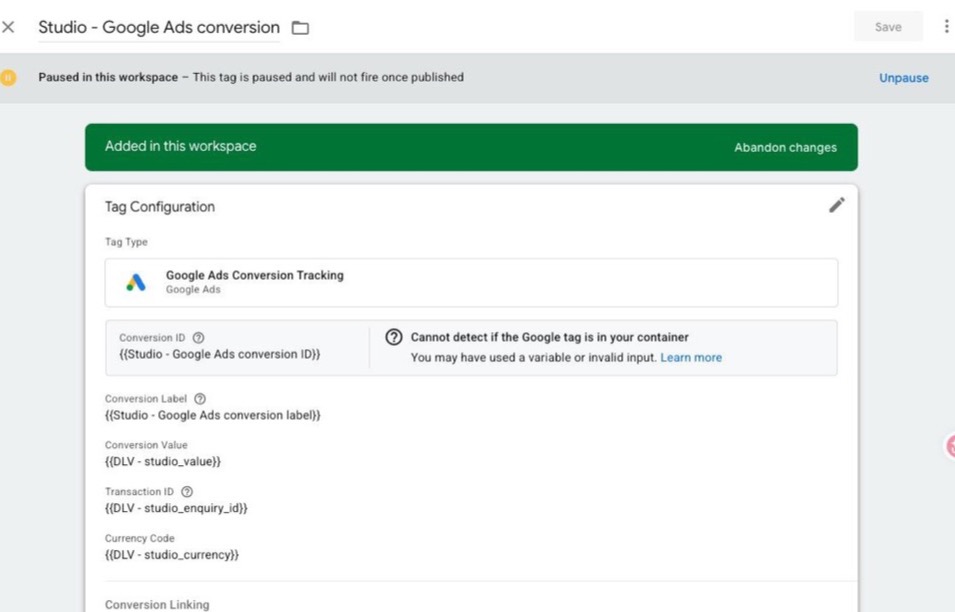
- In Tags, tick
Studio - Google Ads conversionin the list and choose Unpause (or open the tag, ⋮ menu → Unpause). - The Conversion Linker: if your container already has a Conversion Linker on All Pages, delete
Studio - Conversion Linker; otherwise unpause it. - The Google tag. If the conversion tag shows Cannot detect if the Google tag is in your container, check that the container has a Google Tag for this Google Ads account (its Tag ID is
AW-followed by your Conversion ID), firing on Initialization - All Pages. A site already advertising on Google through Tag Manager usually has it. If not: New → Google Tag → Tag IDAW-…→ trigger Initialization - All Pages → Save. (The notice also appears while the ID is a variable, as in this container.) - Consent: if your site uses a consent banner with Google’s consent mode, the Google Ads tag follows it as your other Google tags do; nothing to change.
6. Test before publishing
- In Tag Manager, Preview, and open the page with the configurator.
- In the Tag Assistant window you should see
studio:viewwhen the configurator loads, thenstudio:configurewhen you change an option. - Send a quote request in the configurator (use your own name and write “TEST” in the notes).
studio:quote_submittedappears, and under it Tags Fired showsStudio - Google Ads conversion, with the value and the transaction id in its details. - The test request reaches the maker’s inbox like any other: mark it Lost there so it is not followed up.
No events in the preview? Check that the page uses the code from step 1 (an iframe, not a link), and that Studio - Configurator address matches the address in that code exactly, starting with https and without a slash at the end.
7. Publish
Submit → name the version (“IronMile Studio configurator conversions”) → Publish. In Google Ads, the conversion action’s status moves from Unverified to Recording conversions once real conversions arrive; Google says this can take a few hours, and up to 48 hours.
Won deals: upload them from “Download my data”
Shortcut: the won deals page makes the upload file from “Download my data” for you, in your browser (the file stays on your computer). The steps below are what it does.
A quote request is a lead; a sale is worth more to Google Ads’ bidding. When quote requests turn into sales, you can import them as a second conversion action. The click id that came with each request makes it possible.
- In Google Ads, create a second conversion action: Goals → Conversions → + Create conversion action → Import → CRMs, files or other data sources → track conversions from clicks. Name it, e.g. Configurator won deal.
- In the maker’s admin, Download my data. The zip has
enquiries.csv, with the columnsgclid,gbraid,wbraid,msclkidandutm_…next toid,created_at,status,totalandcurrency. - In Google Ads, Goals → Conversions → Uploads, and download Google’s template (the columns can change; the template is always right).
- For each request that became a sale and has a
gclid, fill in one row:Template column From Google Click ID gclidConversion Name exactly the action’s name, e.g. Configurator won dealConversion Time when the deal was won, e.g. 2026-10-20 14:30:00, with the time zone in the template’s parameter row (or+0000at the end). It must be after the click.Conversion Value the sale’s value (the totalcolumn is the price the buyer configured; use the signed amount if it differs)Conversion Currency currency - Upload the file in Uploads. Google keeps a click id for 90 days: upload won deals within that time, ideally every week or two.
Rows with only gbraid or wbraid (some iPhone clicks) are not accepted by the classic file template; Google’s Data Manager or the API take them. A CRM connected by the webhook gets the same ids in each quote request’s attribution and can do the upload itself.
What this does not do
- It does not change your ads, bids or budgets, and it does not promise more conversions: it counts what already happens.
- Visitors who decline ad cookies, or whose browser blocks Google’s tags, are not counted by the tag (your consent banner decides). The won-deal upload still works for requests that carry a click id.
- The events never carry the buyer’s name, email or phone, so this set-up does not use enhanced conversions.
Sources
- Google Ads Help: Use the Google tag for Google Ads conversion tracking
- Tag Manager Help: Google Ads conversions
- Tag Manager Help: Export and import containers
- Google Ads Help: Import conversions from ad clicks into Google Ads using files
- Google Ads Help: Fix discrepancies and errors in offline conversion imports